Alite Mods - Water and Plumbing
Sink

The first time I saw an Alite, I had visions of installing a sink, and it was the first mod I tackled. It was also the first time I'd worked with an electric saw. A small jig saw and a Workmate portable workbench were all I needed for the basic carpentry. The doorside bench became my kitchencounter. I sawed the bench lid in two, and put a residential bar sink, purchased at Lowe's, in the reear half. Before I attached the sink to the "countertop", I had to drill a new sink hole for my folding faucet. That was definitely the hardest part of the job! Stainless steel is not easy to work with, but persistence and a good hole saw got me through. The sink came with a template for cutting a hole in the countertop. Drilling a hole at each corner made it easy to cut the wood with a jig saw. After the plywood was cut, I covered it with strips of self-stick vinyl oak flooring that closely matches the cabinet finish. Before setting the sink in place, I attached the strainer/drain and put a standard cover over the hole that was not needed for the faucet. The brackets that came with the sink were intended for a 3/4" counter, and I was attaching it to 1/4" plywood. If I were to do it again, I would put 1/2" shims around the underside of the hole, As it was, I fiddled with the brackets to get the tightest grip I could. Before I tightened the brackets, I added a rope of plumber's putty under the sink edge for a watertight seal.
Faucet

I had installed a Shurflo folding faucet in our Aliner Classic and knew it was what I wanted in the Alite, as I was planning for hot and cold water. Unfortunately, the pre-cut holes in the sink did not match the holes needed for the folding faucet. I put a cover on the left-hand hole, used the existing right-hand hold for the left faucet stem, and cut a new hole for the right stem. This put the faucet to the right of center, which is what I intended. The next challenge was to find something to use as a base plate under the faucet - something inexpensive, easy to work with, and attractive. I'd expected to use a blank stainless electric faceplate as I'd done in our Classic. This sink rim, however, was too narrow. After prowling the aisles at Lowe's, I found what I needed in the electrical department: a cover from a rectangular grey plastic electrical "conduit body". I cut off the tabs, ground it smooth on the back side, and drilled holes for the faucet stems. I sealed it with a rope of plumber's putty. The plastic was easy to work with, fits the space, and looks good.
Water Line

 Switching to an AGM battery meant I didn't need the battery vent and could use that hole for incoming water. The vent hole was bigger than the city-water inlet, so I patched it with a square of white vinyl from a gutter cover. A brass elbow stays connected to the inlet, protected with an RV water cap.
 The water line from the inlet to the sink is a braided washer hose. The battery-vent hole was so large that I had to cover the area with a piece of masonite, visible in the picture, to brace the inside connection to the washer hose. A hinged plate screwed to the masonite holds the fitting in place. The hose runs from the water inlet, across the framing ledge on the rear wall, and down a hole in the front right corer of the sink counterop. The wire for the water heater follows the same route. The hold in the countertop is trimmed with a plastic pipe ceiling/floor plate which is flexible enough to slip over both hose and wire. Under the sink, the incoming line connects to a garden-hose "Y". From one leg of the Y, a braided supply hose runs to the cold-water stem of the faucet. The other leg of the Y is connected to the inlet of the tankless water heater under the sink. A braided supply runs from the heater outlet to the hot-water stem of the faucet. I like the braided hoses because they look good and the hose-thread ends can be finger-tightened to a watertight seal. The faucet stems were the last water connections I made, and the hoses were long enough that I could raise the sink counter slightly while I attached them to the faucet.
Water Heater

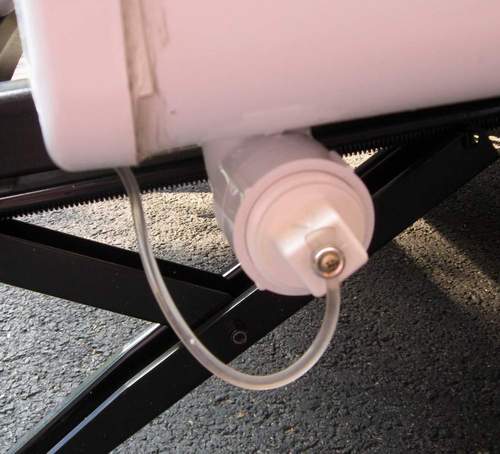
From another Aliner owner, I learned about the Eemax 120v 20 amp tankless water heater. The size and electrical requirements were perfect for the Alite. It required a separate circuit, another first for me (see Electrical Mods). The heater is mounted to the inside of the cabinet wall under the sink, just ot the right of the framing in the middle of that bench, where it just fits. The mounting bolts go through the cabinet from the front, but are camouflaged with brown plastic screw covers. The plumbing was a snap - the top water connections are standard compression fittings - one hose in and one hose out. You can see from the picture how close the fittings are to the top of the cabinet. The in and out hoses flex enough that they just fit. Water flow triggers the heating element - too little and the heater won't come on; too much, and the heater can't keep up. I can hear the switch click when the heater comes on, and I try to keep the flow as low as possible. The heater will raise the water temperature 33 degrees, which doesn't do much for really cold incoming water, but in warm summer weather it's quite hot.
Sink Drain
Once the sink was in , I had to figure out how to construct a drain line. I didn't need a trap, nor was there room for one, so the sink drain is simply two connected 12" flexible extensions, one screwed to the threaded sink outlet and the other to the outside drain which comes through a hole in the camper floor.

The exterior fitting is part of a tub drain. It has threads for the inside drain line and a flange that is screwed to the underside of the camper. The outlet is threaded, so I can close it with a tethered PVC cap. Because of the limited space, all these connections had to be made in a certain order. Before setting the sink counter in place, I finished all of the water and drain connections, except screwing the flexible drain nut to the sink outlet. Once the sink counter was in place, I could make that connection by reaching under the sink. To be sure I don't ignore any unseen leaks, I added a battery-operated water monitor with leads stuck to the floor under the sink (Home Depot, $10).
Bucket

When no sewer connection is available, the drain empties into a collapsible bucket which I keep in a plastic shopping bag in the front storage bin. With a "J" trap screwed to the outside drain, I can direct the water to the bucket which is slid partway under the camper, out of the way.
Sewer


 It seemed pointless to be emptying a grey-water bucket when sewer hookups were available, so inventing a sewer line became the next project. I now have a PVC adapter with female threads on one end, to attach to the "J" trap, and male hose threads on the other end, where I fasten a green garden hose. The other end of that sewer/garden house screws to a grey RV sewer adapter and rubber donut that drops into the campground sewer hookup. Drainage is OK, but it will be better when I add a vent to the camper end of the sewer connections. The garden/sewer hose travels in the front storage bin, with the ends screwed together to keep the hose from dripping and keep the bin dry.


Comments
Post a Comment